Key takeaways
- Do not use steel wool, scouring powder, or a razor. These can leave deep scratches and uneven bright lines.
- Do not clean a hot pan. Let it return to room temperature before adding water or polish.
- Do not soak copper cookware for hours. Prolonged exposure to water and acids can affect joints, linings, and finishes.
- Do not use chlorine bleach, oven cleaner, or ammonia. These aggressive chemicals can discolor copper and irritate the skin and lungs.
- Do not polish only one tiny spot aggressively. Blend the cleaning gently across the full bottom to avoid a bright circle.
- Do not assume every dark mark is dirt. A blackened area caused by a burner flame may be heat-related and may not disappear entirely.
- Do not put copper cookware in the dishwasher unless the manufacturer specifically approves it.
Dark spots on the bottom of a copper pan are usually caused by heat, oxidation, burned-on grease, or contact with a gas flame. They may look alarming, but most surface discoloration can be reduced with gentle cleaning. The key is to match the cleaning method to the finish. If you scrub too aggressively, you can scratch the copper, remove a protective coating, or create uneven bright patches that are more noticeable than the original marks. Harsh chemicals can also damage a tin lining or loosen residue around a pan’s rivets.
This guide explains how to remove dark spots from copper pan bottoms safely, whether you are dealing with a light brown haze, blackened grease, or widespread tarnish. The process is suitable for most solid-copper cookware and copper-bottom pans, but always check the manufacturer’s care instructions first. For the safest results in 2026, start with mild dish soap and a soft cloth, then increase cleaning strength only when necessary.
As an Amazon Associate we earn from qualifying purchases at no extra cost to you. Product prices and availability are accurate as of the date shown and are subject to change.

What You Need
| Item | Why | Optional? |
|---|---|---|
| Warm water | Loosens surface grime and dilutes cleaner | No |
| Dish soap | Breaks down grease and cooking oil | No |
| Microfiber cloth or soft cotton cloth | Applies cleaner without scratching the copper | No |
| Non-scratch nylon sponge | Handles stuck-on residue more effectively than a cloth | Optional |
| White vinegar and table salt | Creates a mild acidic paste for light tarnish | Optional |
| Copper cleaner | Targets oxidation, dark patches, and tarnish | Optional |
| Rubber gloves | Protects hands from cleaner and loosened residue | Optional |
| Clean, dry towel | Prevents water spots after rinsing | No |
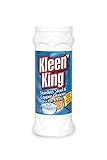
A dedicated product such as King Kleen Stainless Steel Cookware Cleaner and Copper Cleaner is a powder formula priced at about $9 to $11 for a 14-ounce container. A 60-milliliter copper polish may cost about $8 to $10. Prices vary by retailer, and you do not need a specialty cleaner for every stain. Use one only after basic washing fails, and follow the label’s dilution and contact-time directions exactly.
Step-by-Step
1. Identify the pan’s finish and condition (2 to 3 minutes)
Turn the pan over and inspect the dark spots in bright light. Brown, red, or purple discoloration is usually oxidation or heat tarnish. Black, sticky areas are more likely burned grease or food residue. A dull gray area may indicate a worn finish or exposed metal on a copper-bottom pan.
Check whether the copper is bare, lacquered, or coated. If water beads strongly on the surface and the pan has a glossy, uniform appearance, it may have a clear protective lacquer. Do not use vinegar, salt, polish, or abrasive cleaners on lacquer unless the manufacturer specifically permits it. Also check the interior: do not let an exterior cleaner contact a tin lining unless the product label says it is safe.
2. Cool and wash away loose grime (5 minutes)
Make sure the pan is completely cool. Never plunge hot copper cookware into cold water, because rapid temperature changes can warp the base or stress bonded layers.
Mix about 1 teaspoon of dish soap with 2 cups of warm water. Wet a microfiber cloth, wring it out, and wipe the entire bottom. For greasy buildup, lay the damp, soapy cloth over the area for 2 to 3 minutes before wiping again. Use a non-scratch nylon sponge for residue that does not lift with the cloth.
Rinse with clean water and dry immediately. If the dark marks remain but the surface is no longer greasy, move to a tarnish treatment.
3. Try a mild vinegar-and-salt paste (5 to 10 minutes)
For unfinished copper with light or moderate tarnish, mix 1 tablespoon of white vinegar with enough table salt to make a thin paste. Apply a small amount to a hidden section first. If the copper becomes unusually cloudy, streaky, or discolored, rinse it off and stop.
Using a soft cloth, rub the paste over one small section at a time. Work with the copper’s existing grain or in gentle circular motions, applying light pressure for no more than 30 to 60 seconds per section. Do not use this paste on lacquered copper, painted decoration, or a delicate antique finish.
Rinse thoroughly with warm water as soon as the tarnish lifts. Acid left on the metal can continue reacting with copper and produce new discoloration. Wash once with dish soap, rinse again, and dry completely.
4. Use a dedicated copper cleaner for stubborn spots (5 to 15 minutes)
If dark patches remain, use a copper polish or cookware cleaner made for bare copper. Read the label before applying it, especially if the pan combines copper with stainless steel, aluminum, tin, or a nonstick coating.
Apply a small amount—roughly the size of a pea for a 3-by-3-inch section—to a damp cloth rather than spreading a large quantity over the entire base. Rub gently until the dark area begins to brighten. Powder cleaners should be mixed or used according to the package directions; do not sprinkle dry powder onto a wet pan unless the label instructs you to do so.
Keep the cleaner away from seams, rivets, wooden handles, and the pan’s interior. If the bottom has a stainless-steel disk surrounding the copper, work carefully at the boundary to avoid leaving polish trapped in the joint. Wipe away residue every few minutes instead of allowing the cleaner to dry hard on the surface.
5. Rinse, neutralize, and dry completely (3 to 5 minutes)
Rinse the bottom under warm running water or wipe it repeatedly with a clean, wet cloth. A second wash with dish soap helps remove oily polish residue. Rinse until the water runs clear and the surface no longer feels slippery.
Dry the pan immediately with a soft towel, then leave it upside down for 10 to 15 minutes so moisture can leave the handle joints and rim. Water left on copper can create fresh spots, particularly in areas exposed to minerals in hard water.
6. Check the result before repeating (2 minutes)
Inspect the pan only after it is dry. Copper often looks darker while wet. If the marks have improved but are still visible, repeat the mildest successful method once. Avoid more than two or three short polishing rounds in one session. If a spot does not change, it may be heat damage, a coating issue, or a permanent change in the metal rather than removable grime.
Mistakes to Avoid
- Do not use steel wool, scouring powder, or a razor. These can leave deep scratches and uneven bright lines.
- Do not clean a hot pan. Let it return to room temperature before adding water or polish.
- Do not soak copper cookware for hours. Prolonged exposure to water and acids can affect joints, linings, and finishes.
- Do not use chlorine bleach, oven cleaner, or ammonia. These aggressive chemicals can discolor copper and irritate the skin and lungs.
- Do not polish only one tiny spot aggressively. Blend the cleaning gently across the full bottom to avoid a bright circle.
- Do not assume every dark mark is dirt. A blackened area caused by a burner flame may be heat-related and may not disappear entirely.
- Do not put copper cookware in the dishwasher unless the manufacturer specifically approves it.
How Often
Wash the bottom after every use, but polish only when the appearance bothers you or tarnish becomes noticeable. For pans used several times a week, a light copper-cleaning session every 4 to 8 weeks is usually sufficient. A pan used occasionally may need polishing only two or three times a year.
Wipe spills from the exterior as soon as the pan is cool. Grease heated repeatedly on the base is harder to remove than fresh residue. Store the pan fully dry, and avoid stacking rough cookware directly against the copper.
When to Call a Pro or Replace
Consult a cookware repair specialist if the copper is bubbling, separating from a stainless-steel base, deeply pitted, or cracked around a rivet. A professional can sometimes retin the interior of a tin-lined copper pan, but polishing cannot repair worn lining or structural damage.
Consider replacing the pan if the base rocks on a flat surface, the lining is flaking over a broad area, or a handle is loose and cannot be safely tightened. Do not keep cooking with exposed copper inside acidic foods such as tomato sauce, wine-based dishes, or citrus preparations unless the cookware is designed for that use.
FAQ
Can baking soda remove dark spots from a copper pan bottom?
Baking soda is mildly abrasive and can help lift greasy residue, but it is not usually the best choice for copper tarnish. If you use it, make a soft paste with water, rub lightly with a microfiber cloth, and rinse promptly. A copper-specific cleaner is generally more predictable for oxidation.
Why did my copper pan turn black after cooking?
High heat, burner flames extending beyond the base, burned oil, and sulfur-containing foods can darken copper. Gas burners often create uneven patches because the flame heats specific areas. Lowering the flame so it stays beneath the pan can help prevent future blackening.
Can I use lemon and salt instead of vinegar?
Yes, lemon juice and salt can work similarly on unfinished copper. Apply the mixture briefly, rub gently, and rinse immediately. Do not use it on lacquered copper or leave it on the surface while you clean other parts of the kitchen.
Will polishing remove all dark spots permanently?
Not necessarily. Polishing removes surface tarnish, but heat discoloration, pitting, worn lacquer, and damage beneath a coating may remain. Copper also naturally darkens again when exposed to air, moisture, and heat. Regular drying and moderate stovetop temperatures will slow the return of dark spots.